|
|
|
Migrating data from PostgreSQL to SQL Server
This guide walks you through migrating data from PostgreSQL to SQL Server in a few simple steps using ESF Database Migration Toolkit. Simplify complex migration tasks and save valuable time with our streamlined approach.
PostgreSQL vs. SQL Server:
- PostgreSQL is a powerful, open-source relational database management system known for its reliability, robust feature set, and extensibility. It offers support for a wide range of data types, indexing techniques, and advanced features such as full-text search, JSON support, and geospatial data processing. With a strong emphasis on standards compliance and ACID compliance, PostgreSQL is widely used across various industries for handling complex data management tasks, from small-scale projects to large-scale enterprise applications. Its active community, frequent updates, and ecosystem of extensions contribute to its popularity and ongoing development.
- SQL Server is a robust relational database management system developed by Microsoft, designed for a wide range of data management applications. It supports a variety of transaction processing, business intelligence, and analytics applications in corporate IT environments. Known for its high performance, scalability, and security features, SQL Server offers comprehensive tools for database creation, management, and maintenance, making it a preferred choice for both small-scale applications and large enterprise systems. Its integration with other Microsoft products and services further enhances its versatility and ease of use.
Prerequisite:
Software Required:
DMToolkit_x64.zip
(63.6 MiB)64-bit Windows application for ESF Database Migration Toolkit 12.2.08 (2025-07-11).
(md5: e93a0ef57622bfd8ee77d6aa6e38c13b)DMToolkit_win32.zip
(58.8 MiB)32-bit Windows application for ESF Database Migration Toolkit 12.2.08 (2025-07-11).
(md5: bd34cb7f73c88c6d0c7a44069ad756d6)System Supported:
- Windows 7 or higher.
- PostgreSQL 7.x or higher.
- SQL Server 6.5 or higher.
Step by Step Wizard:
-
Configure PostgreSQL Data Source
- In the "Choose a Data Source" dialog:
- Select "PostgreSQL"
- Enter server connection details:
- Server name:
localhost(default) - Port:
5432(default)
- Server name:
- Provide authentication credentials:
- Username:
postgres(default) - Associated password
- Username:
- Database selection:
- Click the Refresh Database button
- Select target database from available options
- Schema selection:
- Click the Refresh Schema button
- Choose desired schema (
publicschema is default)
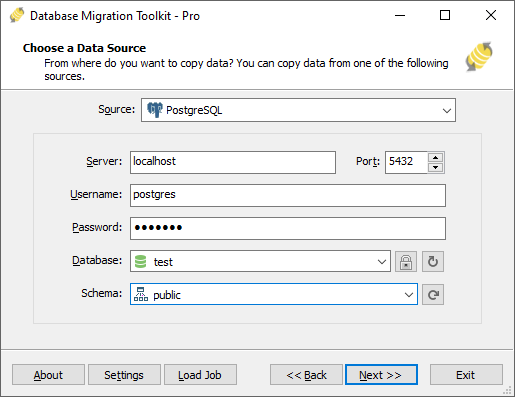
Fig. 1: PostgreSQL data source configuration - In the "Choose a Data Source" dialog:
-
Configure Microsoft SQL Server Destination
- In the "Choose a Destination" dialog:
- Select "Microsoft SQL Server"
- Server connection details:
- Enter SQL Server host name (optionally with instance name), e.g.,
localhost\sqlexpress - For TCP/IP connections:
- Specify server port (default:
0uses named pipes) - Provide username (e.g.,
sa) and password
- Specify server port (default:
- For Windows Authentication:
- Check the Windows Authentication checkbox
- Enter SQL Server host name (optionally with instance name), e.g.,
- Database configuration:
- Click the Refresh button to list existing databases
- Select existing database or enter new database name
- Note: Non-existing databases will be automatically created during migration
- Schema configuration:
- Click the refresh button to list existing schemas
- Select existing schema or enter new schema name
- Default schema:
dbo(if left blank) - Note: Non-existing schemas will be automatically created during migration

Fig. 2: Microsoft SQL Server destination configuration - In the "Choose a Destination" dialog:
-
In "Select Source Table(s) & View(s)" Dialog
-
Select migration objects: Choose tables or views to include in the migration.
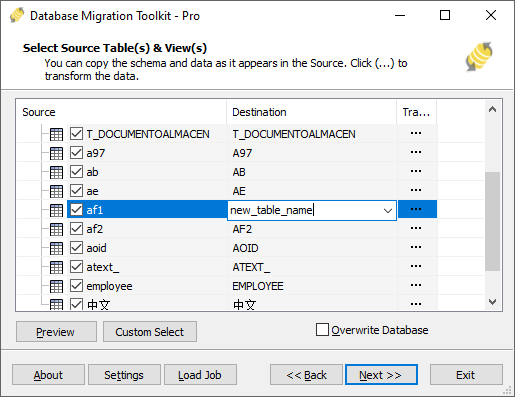
Fig. 3: Select tables and views -
Modify table structure: Click the ellipsis (...) button to access table options and schema adjustments.
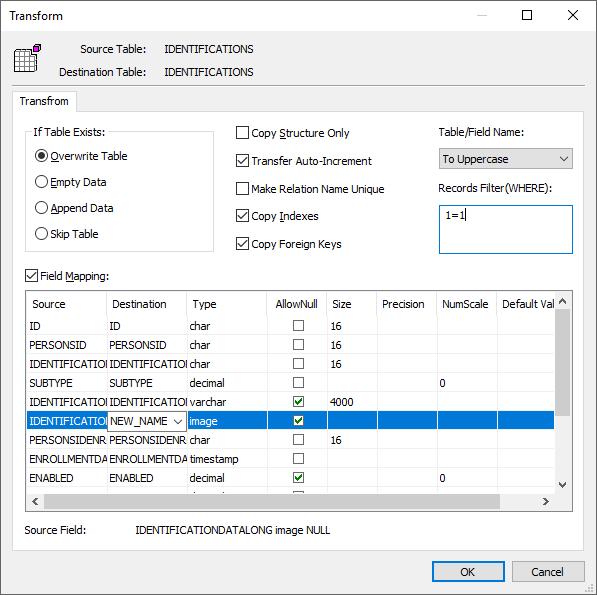
Fig. 4: Do transform -
Configure field mapping: In the Field Mapping options:
- Customize destination fields (name, data type, default value, comments)
- Select data transfer method:
- Overwrite Table (replace existing data)
- Empty Data (truncate before insert)
- Append Data (add to existing data)
- Skip Table (exclude from transfer)
- Apply data filters before transfer
-
Select migration objects: Choose tables or views to include in the migration.
-
Execution Dialog
-
Start migration: Click "Submit" to initiate automated data transfer from PostgreSQL to SQL Server.
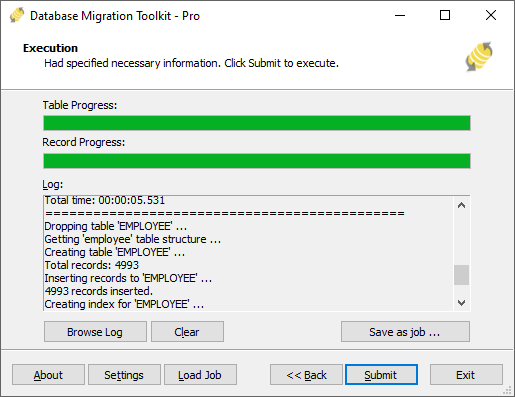
Fig. 5: Execute migration - Monitor progress: Click "Browse Log" for real-time migration tracking, including issue resolution details.
-
Save configuration: Click "Save as job" to store settings for:
- Quick reloads of migration jobs
- Command-line execution (use:
dmtc.exe --helpfor parameter options)
-
Start migration: Click "Submit" to initiate automated data transfer from PostgreSQL to SQL Server.
-
Finished!
After migration completes, the toolkit generates a comprehensive report for verifying migration accuracy. You can monitor progress as the automated process runs efficiently. For any questions or feedback, contact us – our team is ready to assist.