
How to Migrate PostgreSQL to SQL Server – Step by Step Guide
This comprehensive guide walks you through every step of migrating your data from PostgreSQL to SQL Server using ESF Database Migration Toolkit. Whether you're upgrading your infrastructure, moving to the cloud, or consolidating database systems, this tutorial covers everything from prerequisites to verification — complete with screenshots and expert tips.
Why Migrate from PostgreSQL to SQL Server?
Organizations choose to migrate between database platforms for a variety of strategic, operational, and technical reasons. Below are the most common drivers for moving from PostgreSQL to SQL Server:
- Performance & Scalability — Move to a database platform that better suits your growing data needs, with improved query performance and handling of large datasets.
- Cost Optimization — Reduce licensing and operational costs by switching to a more efficient or open-source database system.
- Modern Infrastructure — Upgrade from legacy database systems to modern, cloud-ready platforms with better security and support.
- Simplified Management — Consolidate multiple database types into a unified environment, reducing administrative overhead.
- Feature Requirements — Leverage advanced features like native JSON support, better indexing, or improved replication capabilities.
With ESF Database Migration Toolkit, the entire migration process is streamlined through an intuitive wizard interface — no manual scripting or complex configurations required.
Prerequisites
Software Required:
Download ESF Database Migration Toolkit »
System Requirements:
- Windows 7 or higher (Windows 10/11 recommended)
- PostgreSQL 7.x or higher — installed and accessible
- SQL Server 6.5 or higher — installed and accessible
- Appropriate database connection credentials (server, port, username, password)
Ready to get started? Download ESF Database Migration Toolkit free trial today.
Step-by-Step Migration Guide
Follow these simple steps to migrate your data from PostgreSQL to SQL Server using ESF Database Migration Toolkit:
-
Step 1: Configure PostgreSQL as Source
Launch ESF Database Migration Toolkit and click "Next" to open the "Choose a Data Source" dialog. Select PostgreSQL and enter your connection details.
Configure PostgreSQL Data Source
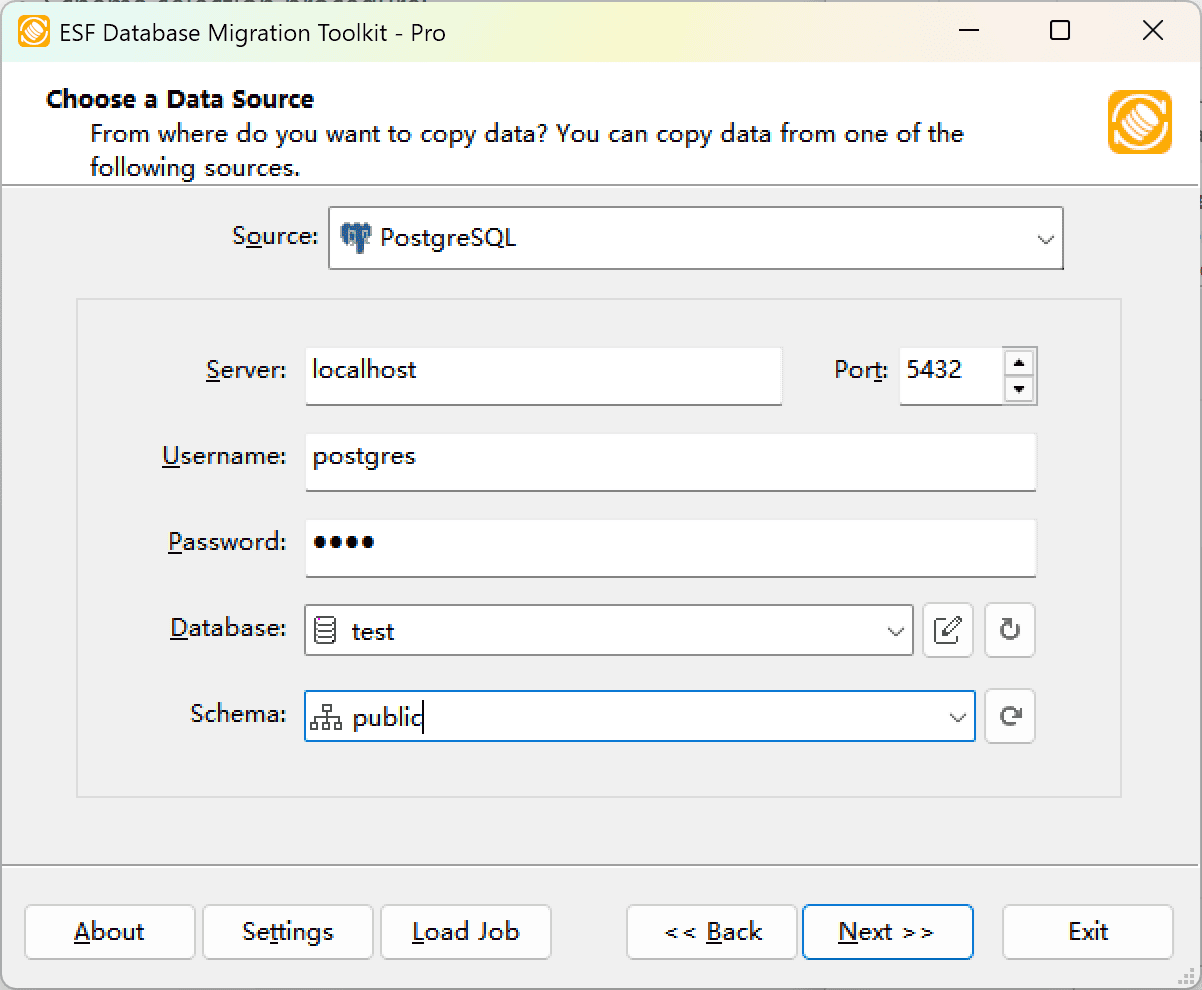
Fig. 1: PostgreSQL data source configuration - In the "Choose a Data Source" dialog:
- Select "PostgreSQL"
- Enter server connection details:
- Server name:
localhost(default) - Port:
5432(default)
- Server name:
- Provide authentication credentials:
- Username:
postgres(default) - Associated password
- Username:
- Database selection:
- Click the Refresh Database button
- Select target database from available options
- Schema selection:
- Click the Refresh Schema button
- Choose desired schema (
publicschema is default)
- In the "Choose a Data Source" dialog:
-
Step 2: Configure SQL Server as Destination
In the "Choose a Destination" dialog, select SQL Server and configure the connection settings for your target database.
Configure Microsoft SQL Server Destination
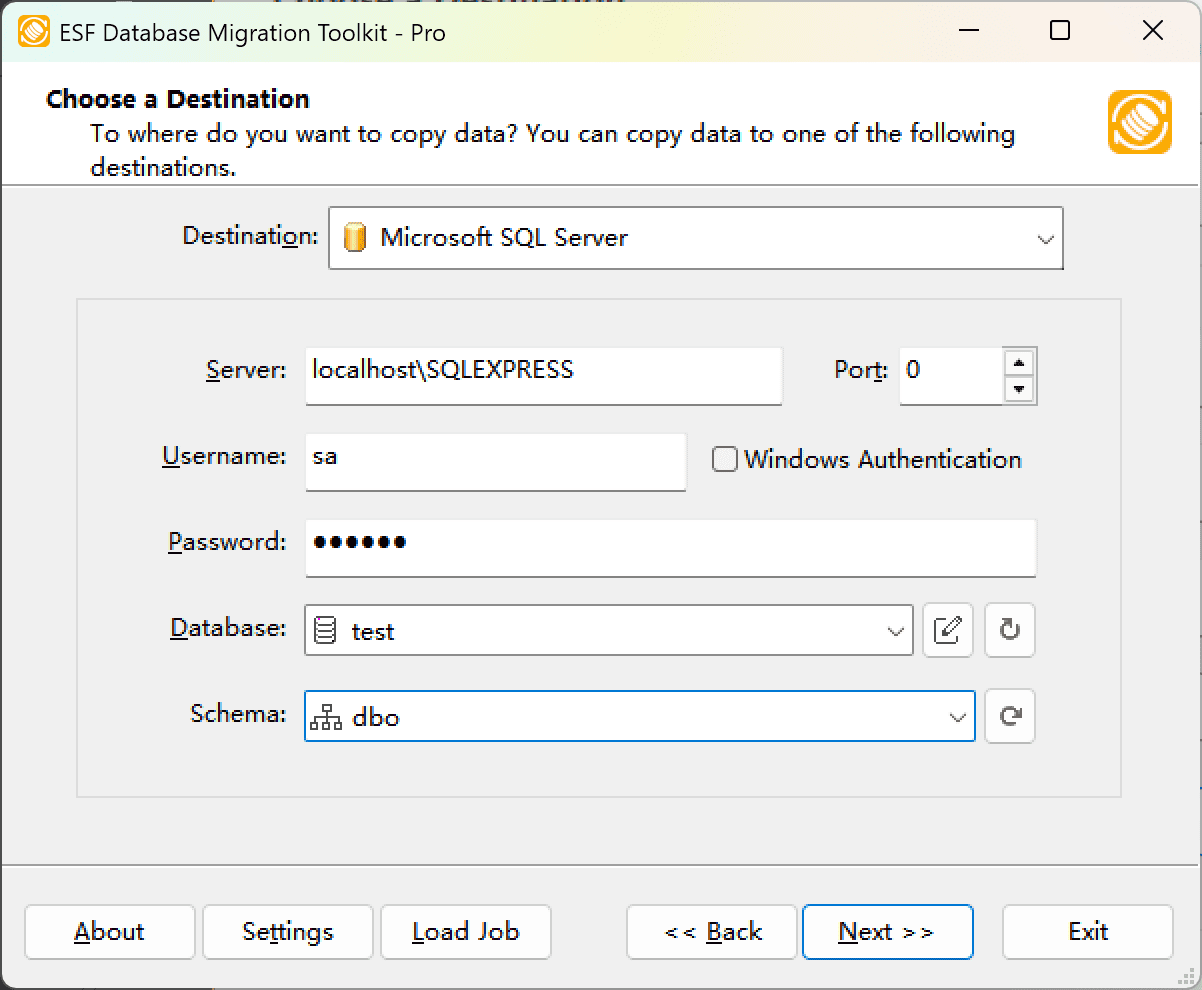
Fig. 2: Microsoft SQL Server destination configuration - In the "Choose a Destination" dialog:
- Select "Microsoft SQL Server"
- Server connection details:
- Enter SQL Server host name (optionally with instance name), e.g.,
localhost\sqlexpress - For TCP/IP connections:
- Specify server port (default:
0uses named pipes) - Provide username (e.g.,
sa) and password
- Specify server port (default:
- For Windows Authentication:
- Check the Windows Authentication checkbox
- Enter SQL Server host name (optionally with instance name), e.g.,
- Database configuration:
- Click the Refresh button to list existing databases
- Select existing database or enter new database name
- Note: Non-existing databases will be automatically created during migration
- Schema configuration:
- Click the refresh button to list existing schemas
- Select existing schema or enter new schema name
- Default schema:
dbo(if left blank) - Note: Non-existing schemas will be automatically created during migration
- In the "Choose a Destination" dialog:
-
Step 3: Select Tables and Configure Mapping
Choose the specific tables and views you want to migrate, then customize the field mappings between source and destination.
In "Select Source Table(s) & View(s)" Dialog
-
Select migration objects: Choose tables or views to include in the migration.
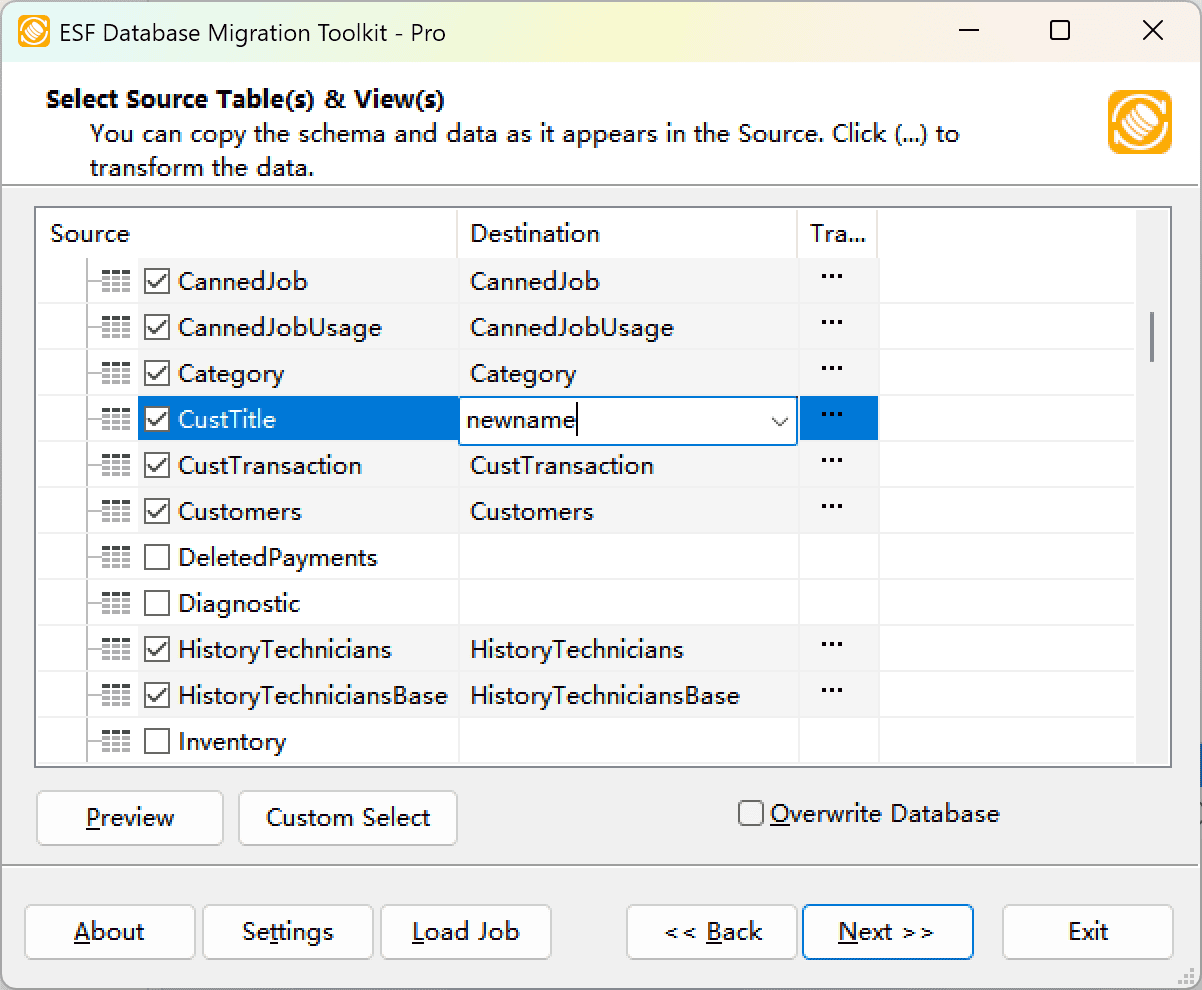
Fig. 3: Select tables and views -
Modify table structure: Click the ellipsis (...) button to access table options and schema adjustments.
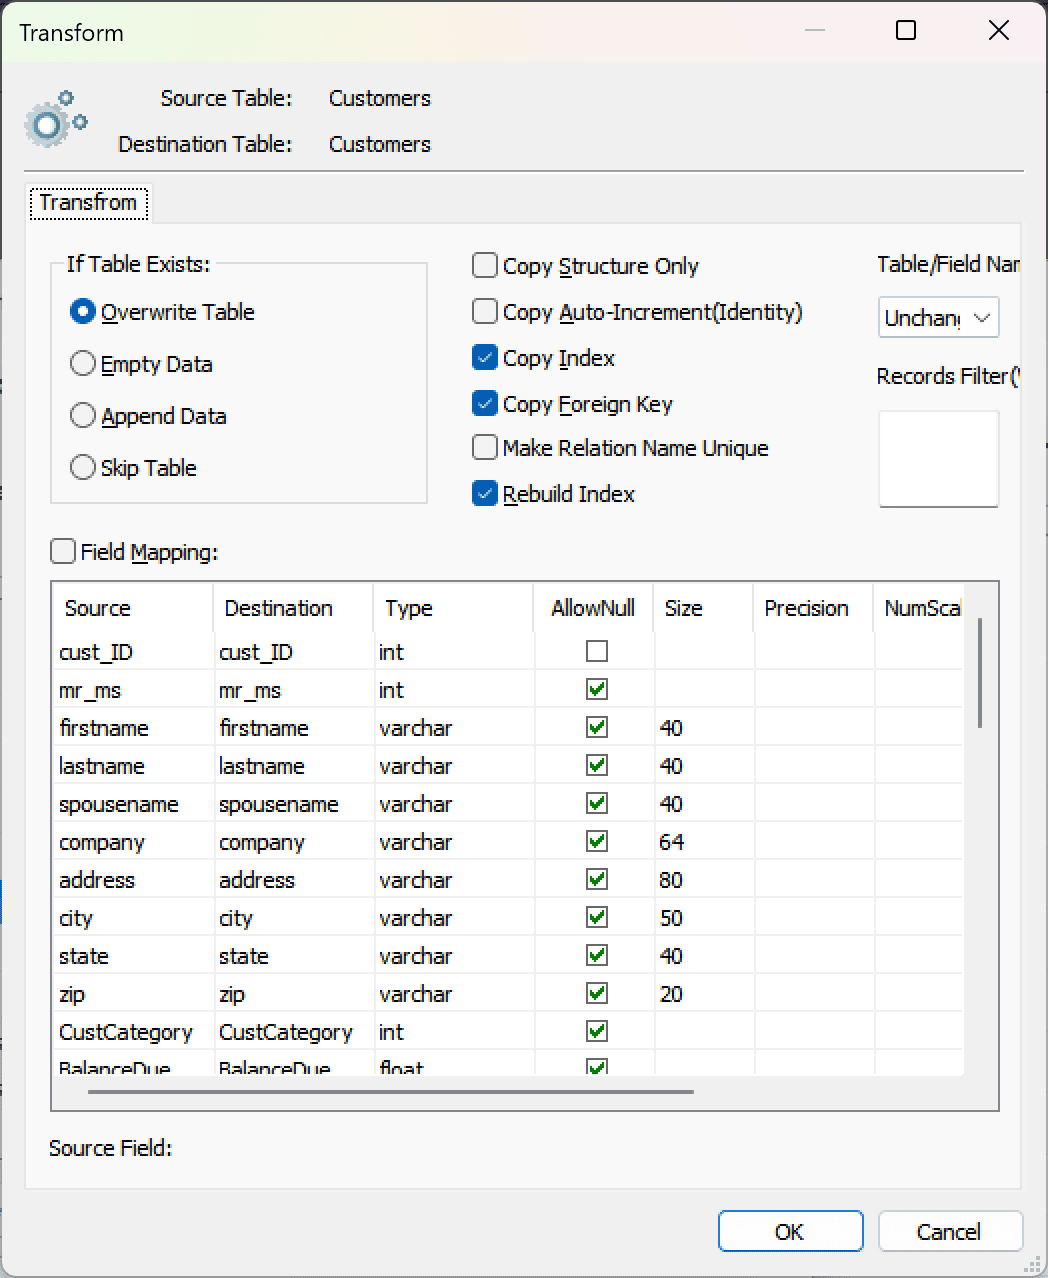
Fig. 4: Do transform -
Configure field mapping: In the Field Mapping options:
- Customize destination fields (name, data type, default value, comments)
- Select data transfer method:
- Overwrite Table (replace existing data)
- Empty Data (truncate before insert)
- Append Data (add to existing data)
- Skip Table (exclude from transfer)
- Apply data filters before transfer
-
Select migration objects: Choose tables or views to include in the migration.
-
Step 4: Execute Migration
Review your settings and start the automated data transfer process.
Execution Dialog
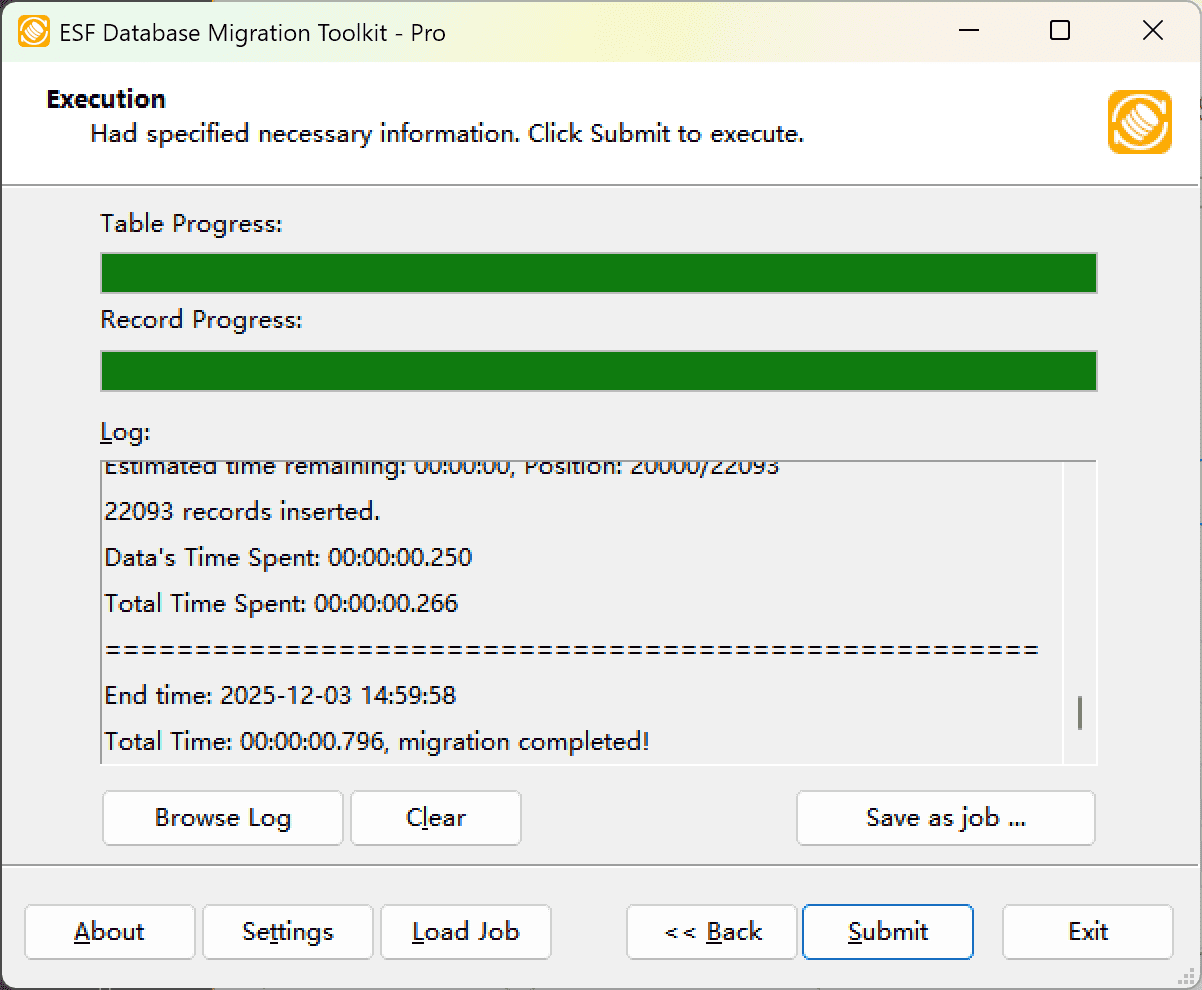
Fig. 5: Execute migration - Start migration: Click "Submit" to initiate automated data transfer from PostgreSQL to SQL Server.
- Monitor progress: Click "Browse Log" for real-time migration tracking, including issue resolution details.
-
Save configuration: Click "Save as job" to store settings for:
- Quick reloads of migration jobs
- Command-line execution (use:
dmtc.exe --helpfor parameter options)
-
Step 5: Verify Results
After the migration completes, verify that all data has been transferred correctly.
Troubleshooting & Common Issues
Connection Errors
If you encounter connection issues when configuring PostgreSQL or SQL Server, verify the following:
- Firewall settings — Ensure the database port is not blocked by Windows Firewall or network security policies
- Authentication — Double-check username and password; some databases require specific authentication modes
- Network access — Confirm that the database server allows remote connections from your machine
- ODBC drivers — For certain databases, ensure the appropriate ODBC driver is installed on your system
Slow Migration Performance
- Large datasets — ESF Database Migration Toolkit uses bulk-insert technology, but extremely large tables (millions of rows) may take time. Consider migrating during off-peak hours.
- Network latency — For remote database servers, network bandwidth and latency can impact transfer speed
- Index overhead — Consider migrating without indexes first, then adding them afterward for faster data insertion
Frequently Asked Questions
Does the migration preserve my existing data?
Yes. When migrating to the destination database, you can choose between overwriting existing data or appending to it. The tool does not modify your source data unless you explicitly choose to.
How long does the migration take?
Migration speed depends on data volume, network connectivity, and database performance. Thanks to the bulk-insert technology, ESF Database Migration Toolkit can migrate large datasets with millions of records efficiently. Typical throughput ranges from 10,000 to 100,000 rows per minute depending on your environment.
Can I migrate only specific tables or fields?
Yes. During the mapping step (Step 3), you can select specific tables and views to migrate, and customize field mappings. You can also apply data filters (WHERE conditions) to migrate only the rows that meet your criteria.
Does ESF Database Migration Toolkit support Unicode and different character sets?
Yes. The tool fully supports UNICODE and automatic character set conversion between different encodings (UTF-8, CP1250, LATIN, ASCII, etc.). This ensures that special characters, accented letters, and non-Latin scripts are preserved correctly during migration.
Can I schedule migrations to run automatically?
Yes. ESF Database Migration Toolkit supports command-line execution and job saving. You can save your migration configuration as a job file and run it via command line using dmtc.exe --job=yourjob.mjf. This allows you to automate migrations using Windows Task Scheduler.
What happens if the migration fails mid-way?
ESF Database Migration Toolkit provides detailed transaction logging. In case of an error, you can review the log to identify the problematic records, fix the issue, and resume the migration. The tool supports transactional integrity to prevent data corruption.
Ready to migrate from PostgreSQL to SQL Server?
Start your free trial today — no credit card required.
Download Now »